
HW 00 - Prefresher
Homework
Important
This homework is due September 3 at 11:59pm ET.
This homework will introduce you to the course computing workflow. The main goal is to reinforce your understanding of Positron and Quarto, which we will be using throughout the course.
An additional goal is to reinforce Git and GitHub, the collaboration and version control system that we will be using throughout the course.
Note
Git is a version control system (like “Track Changes” features from Microsoft Word but more powerful) and GitHub is the home for your Git-based projects on the internet (like DropBox but much better).
Learning objectives
- Familarize yourself with the workflow using Python or R, Positron, Git, and GitHub
- Write a reproducible report using Quarto
- Implement version control using GitHub
- Review common methods for data wrangling
- Implement basic data visualizations
Getting started
Access Positron
If you plan to use your own computer
- Make sure you have completed the software setup instructions.
- Open Positron.
If you plan to use Posit Workbench
- Go to https://posit-workbench.infosci.cornell.edu and log in with your Cornell NetID and Password.
- Click the “New Session” button on the top of the page. Selection Positron Pro. Leave all the settings on their default state and click “Start Session”. You should now see a Positron session.
Positron IDE
Below are the components of the Positron IDE.
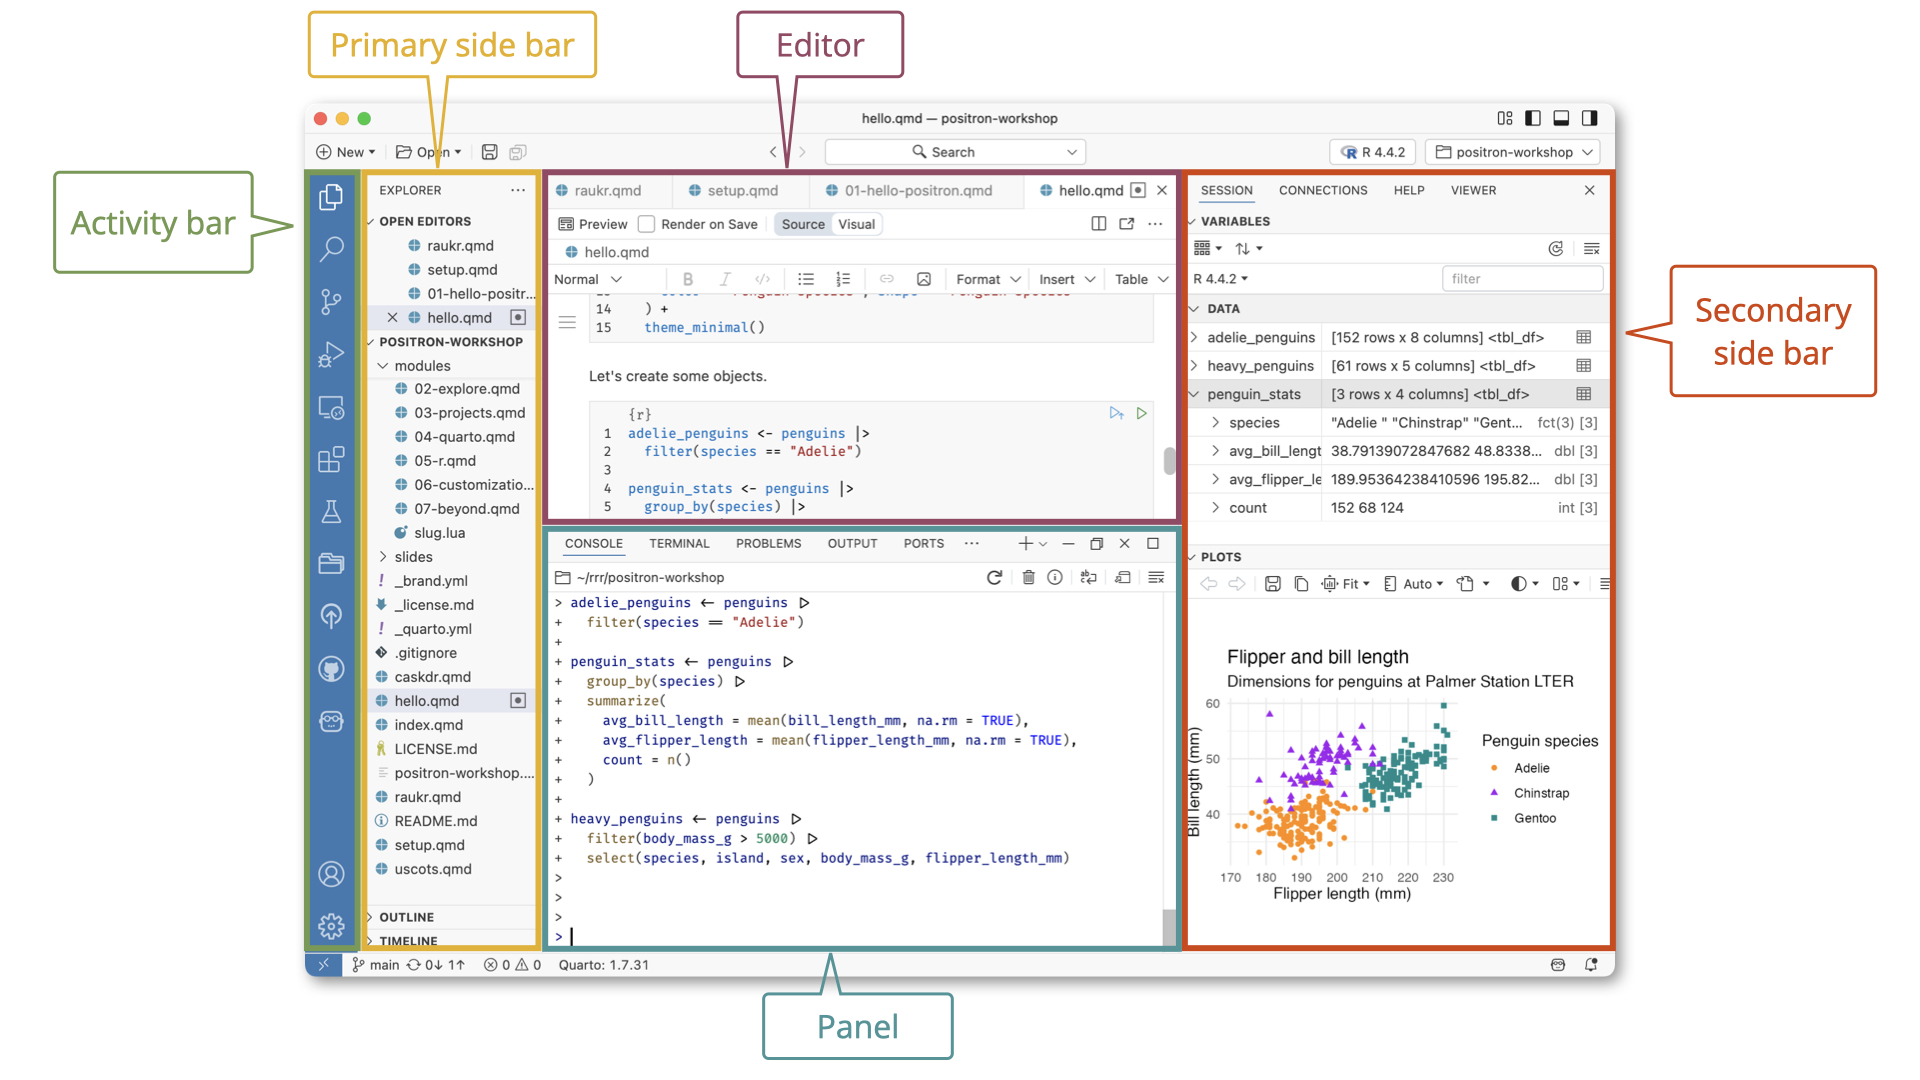
See the Positron documentation for more information on the layout.
Using Quarto
ImportantComplete the Quarto tutorials
I’m not reinventing the wheel here. If you’ve never used Quarto before, I highly recommend working through the Quarto Getting Started Guide, especially the “Hello, Quarto” and “Computations” sections. They are not for a grade, but they will help you get familiar with the Quarto workflow with lots of visual documentation using your IDE of choice.
Setup your GitHub authentication using a Personal Access Token (PAT)
NoteJust do it in R
You can do all the authentication steps using the Terminal, but we recommend you do it using R. I haven’t found a comparable set of helper functions for Python. You can also do it from the Terminal but I’ll leave that to you to figure out if you wish.
NoteIf you are using your own computer
Run the following code in the R console to ensure you have the required packages installed:
install.packages(c("usethis", "gitcreds", "gh", "renv"))In order to push changes to GitHub, you need to authenticate yourself. That is, you need to prove you are the owner of your GitHub account. When you log in to GitHub.com from your browser, you provide your username and password to prove your identity. But when you want to push and pull from your computer, you cannot use this method. Instead, you will prove your identity using one of two methods.
A personal access token (or PAT) is a string of characters that can be used to authenticate a user when accessing a computer system instead of a username and password. Many online services are shifting towards requiring PATs for security reasons.
Note
This method is preferred since it allows for seamless communication between R and Git for all possible applications.
With this method you will clone repositories using a regular HTTPS url like https://github.com/<OWNER>/<REPO>.git.
NoteIf you are using Posit Workbench
Configure the Git credential helper by running the following R code in the console:
usethis::use_git_config(credential.helper = "store")Create your personal access token
Run this code from your R console:
usethis::create_github_token(
  scopes = c("repo", "user", "gist", "workflow"),
  description = "Posit Workbench",
  host = "https://github.coecis.cornell.edu/"
)
This is a helper function that takes you to the web form to create a PAT.
- Give the PAT a description (e.g. “PAT for INFO 5001”)
- Leave the remaining options on the pre-filled form selected and click “Generate token”. As the page says, you must store this token somewhere, because you’ll never be able to see it again, once you leave that page or close the window. For now, you can copy it to your clipboard (we will save it in the next step).
If you lose or forget your PAT, just generate a new one.
Store your PAT
In order to store your PAT so you don’t have to reenter it every time you interact with Git, we need to run the following code:
gitcreds::gitcreds_set(url = "https://github.coecis.cornell.edu/")When prompted, paste your PAT into the console and press return. Your credential should now be saved on your computer.
Confirm your PAT is saved
Run the following code:
gh::gh_whoami(.api_url = "https://github.coecis.cornell.edu/")

usethis::git_sitrep()
You should see output that provides information about your GitHub account.
Configure Git
There is one more thing we need to do before getting started on the assignment. Specifically, we need to configure your git so that Positron can communicate with GitHub. This requires two pieces of information: your name and email address.
To do so, you will use the use_git_config() function from the {usethis} package. Type the following lines of code in the console in Positron filling in your name and the email address associated with your GitHub account.
usethis::use_git_config(
  user.name = "Your name",
  user.email = "Email associated with your GitHub account"
  )
For example, mine would be
usethis::use_git_config(
  user.name = "Benjamin Soltoff",
  user.email = "bcs88@cornell.edu"
  )
You are now ready to interact with GitHub via Positron!
Clone the repo & start a new Positron workspace
Go to the course organization at https://github.coecis.cornell.edu/info5001-fa25 organization on GitHub. Click on the repo with the prefix hw-00. It contains the starter documents you need to complete the homework.
Click on the green CODE button, select HTTPS or SSH based on the authentication method you set up previously. Click on the clipboard icon to copy the repo URL.
In Positron, open the command palette by pressing
Ctrl + Shift + P(orCmd + Shift + Pon a Mac). TypeGit: Cloneand select it from the list.Paste the URL you copied from GitHub into the dialog box that appears.
Choose a location to save the repo on your computer. This will create a new folder with the name of the repo in the location you selected.
Once the cloning is complete, Positron will prompt you to open the cloned repository. Click Open to open the repo in a new Positron workspace.
Click hw-00-prefresher.qmd to open the template Quarto file. This is where you will write up your code and narrative for the homework.
R or Python?
Quarto has support for natively rendering both Python and R through the use of rendering engines. Python code cells are evaluated using a Jupyter kernel, while R code cells are evaluated using an R session via {knitr}. You cannot mix and match Python and R code cells in the same document.1
You can explicitly set the rendering engine in the YAML of your document.
engine: jupyter # for Python
engine: knitr # for R
Alternatively, Quarto will automatically detect the rendering engine based on the presence of code cells in your document. If there are R code cells, it will use {knitr}. Otherwise it will use Jupyter.
Since I do not wish to assume your programming language of choice, for this assignment I have created two versions of the homework template: one for Python and one for R. You should use the version that corresponds to your programming language of choice. On future assignments, I will only provide one version of the homework template and it will be up to you to add the appropriate code cells.
Reproducible environments
Project-oriented workflows benefit from reproducible environments. There are three major benefits to reproducible environments:
- Isolation: Each project has its own set of packages, avoiding conflicts between projects.
- Portability: Projects can be shared with others without worrying about package versions or dependencies.
- Reproducibility: Projects can be run on different systems with the same results, as all package versions are controlled.
In this class, we will use distinct tools for managing reproducible environments based on whether you are using Python or R.
NoteI’m using Python -
uv
uv is a modern Python package and project manager. It replaces tools such as pip and virtualenv by providing a unified interface for managing packages and virtual environments. It also supports project-based workflows to create isolated project environments with specific package versions, ensuring that everyone in the class can reproduce the same results, whether you are using Posit Workbench or your own computer.
While the overall workflow is somewhat complex, we will try to keep things simple in this class. We pre-configure each assignment’s repo with a pyproject.toml file that lists the minimum required packages that need to be used for this assignment.
To access these packages, when you first clone the repo run
uv syncfrom the Terminal. This will create a virtual environment for the project and install the required packages. Positron should automatically detect the virtual environment and prompt you to activate it for running Python. The Console tab should then include a Python interpreter in addition to the R interpreter. When you run Python code cells in your Quarto document, they will use the Python interpreter.
To install additional Python packages, use the Terminal command
uv addto add these dependencies to your project environment. This will install the package and update the pyproject.toml file to include the new dependency.
NoteI’m using R - {renv}
{renv} is an R package to manage reproducible environments. It allows us to create isolated project environments with specific package versions, ensuring that everyone in the class can reproduce the same results, whether you are using Posit Workbench or your own computer.
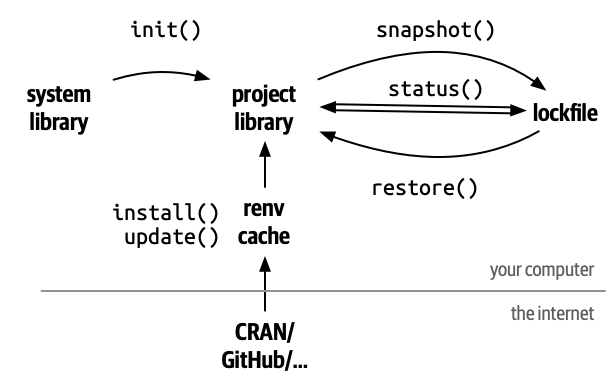
While the overall workflow is somewhat complex, we keep things simple in this class. We pre-configure each assignment repo’s lockfile to list the minimum required packages that need to be installed. To access these packages, when you first clone the repo run
renv::restore()This will retrieve installed packages from your cache folder, or download and install packages you have not used before.
YAML
The top portion of your Quarto file (between the three dashed lines) is called YAML. It stands for “YAML Ain’t Markup Language”. It is a human friendly data serialization standard for all programming languages. All you need to know is that this area is called the YAML (we will refer to it as such) and that it contains meta information about your document.
Important
Open the Quarto (.qmd) file in your workspace, change the author name to your name, and render the document. Examine the rendered document.
Committing changes
Now, go to the Git pane in your Positron instance. This will be in the sidebar through the Git icon.
If you have made changes to your Quarto (.qmd) file, you should see it listed here. Click on it to view the difference between the last committed state of the document and its current state including changes. You should see deletions in red and additions in green.
If you’re happy with these changes, we’ll prepare the changes to be pushed to your remote repository. First, stage your changes by selecting each file to be included in the commit (the + icon). Next, write a meaningful commit message (for instance, “updated author name”) in the Commit message box. Finally, click Commit. Note that every commit needs to have a commit message associated with it.
You don’t have to commit after every change, as this would get quite tedious. You should commit states that are meaningful to you for inspection, comparison, or restoration.
In the first few assignments we will tell you exactly when to commit and in some cases, what commit message to use. As the semester progresses we will let you make these decisions.
Push changes
Now that you have made an update and committed this change, it’s time to push these changes to your repo on GitHub.
In order to push your changes to GitHub, you must have staged your commit to be pushed. Click on Push.
General guidance
TipGuidelines + tips
As we’ve discussed in lecture, your plots should include an informative title, axes should be labeled, and careful consideration should be given to aesthetic choices.
Remember that continuing to develop a sound workflow for reproducible data analysis is important as you complete the lab and other assignments in this course. There will be periodic reminders in this assignment to remind you to render, commit, and push your changes to GitHub. You should have at least 3 commits with meaningful commit messages by the end of the assignment.
TipWorkflow + formatting
Make sure to
- Update author name on your document.
- Label all code chunks informatively and concisely.
- Follow consistent code style guidelines.
- Make at least 3 commits.
- Resize figures where needed, avoid tiny or huge plots.
- Turn in an organized, well formatted document.
Part 1: They’re eating the dogs, they’re eating the cats!
Exercise 1
Report on American attitudes on the consumption of various animals. YouGov polled 1,000 U.S. adult citizens on topics related to vegetarianism and the eating of meat. Question 19 specifically asked respondents
Setting aside your own dietary preferences, do you think it is morally acceptable or unacceptable for other people to eat the following animal under normal circumstances?
The cross-tabulation table reporting the results is stored in data/eating-animals.csv. Use the data set to reproduce the visualization below.
Note
Your plot need not be exactly the same in terms of its dimensions, color palette, etc. Practice importing, wrangling, and visualizing data. However, this is a good template to guide your journey.
Now is a good time to render, commit, and push.
Make sure that you commit and push all changed documents and your Git pane is completely empty before proceeding.
Part 2: The economics of prison commissaries
Prison commissaries in the United States have been accused of inflating the cost of essential items sold to incarcerated individuals at significantly higher prices than those charged outside of prison. To investigate these claims, The Appeal compiled a national database of prison commissary lists. The resulting raw price data can be found in data/commissary-prices.csv.
Use the data set to answer the following questions.
Exercise 2
Which states have the most expensive Ramen on average? Calculate the average price of ramen per state and print a table reporting the 10 most expensive states and their average price.
Now is a good time to render, commit, and push.
Make sure that you commit and push all changed documents and your Git pane is completely empty before proceeding.
Exercise 3
Which states have the cheapest deodorant? Calculate the lowest price for deodorant per state and print a table reporting the 10 least expensive states and their minimum price.
Now is a good time to render, commit, and push.
Make sure that you commit and push all changed documents and your Git pane is completely empty before proceeding.
Generative AI (GAI) self-reflection
As stated in the syllabus, include a written reflection for this assignment of how you used GAI tools (e.g. what tools you used, how you used them to assist you with writing code), what skills you believe you acquired, and how you believe you demonstrated mastery of the learning objectives.
Render, commit, and push one last time.
Make sure that you commit and push all changed documents and your Git pane is completely empty before proceeding.
Submission
Once you are finished with the homework, you will submit your final PDF document to Gradescope.
Warning
Before you wrap up the assignment, make sure all documents are updated on your GitHub repo. We will be checking these to make sure you have been practicing how to commit and push changes.
You must turn in a PDF file to the Gradescope page by the submission deadline to be considered “on time”.
To submit your assignment:
- Go to http://www.gradescope.com and click Log in in the top right corner.
- Click School Credentials \(\rightarrow\) Cornell University NetID and log in using your NetID credentials.
- Click on your INFO 4940/5940 course.
- Click on the assignment, and you’ll be prompted to submit it.
- Mark all the pages associated with exercise. All the pages of your homework should be associated with at least one question (i.e., should be “checked”).
Grading (0 pts)
ImportantThis assignment is not graded
It is intended to help you get familiar with the course workflow and tools. You should complete it and submit to Gradescope by the deadline but you will not receive a grade for it. Failure to complete and submit the assignment will likely leave you in a poor starting position for your future assignments.
| Component | Points |
|---|---|
| Ex 1 | 0 |
| Ex 2 | 0 |
| Ex 3 | 0 |
Footnotes
At least, not easily.↩︎